Amazon Cognito: Facebook Authentication (iOS)
January 3, 2015
This is another post in a series about Amazon Cognito. Please read previous post before continuing.
In this post I will be adding functionality to the app that was build in previous part. Mainly I will show you how to combine Amazon Cognito and Facebook to provide federated authentication.
Facebook App
In order to use Facebook authentication we need Facebook App Id which we can register with Cognito. You can create your app in here: http://developer.facebook.com
I will not describe how to create an app but you can follow this easy tutorial to get you started:
https://developers.facebook.com/docs/games/appcenter/tutorial
Once you are done, you can find the App Id on the Dashboard:

Register Facebook App with Cognito
First thing to do is to register your Facebook App Id in Cogntio. To do so go to your AWS Console and edit your identity pool. In identity pool details view there is a link in the right hand corner that allows you to edit settings. Enter the Facebook App Id in the Public Identity Providers section (you need to click unlock first):
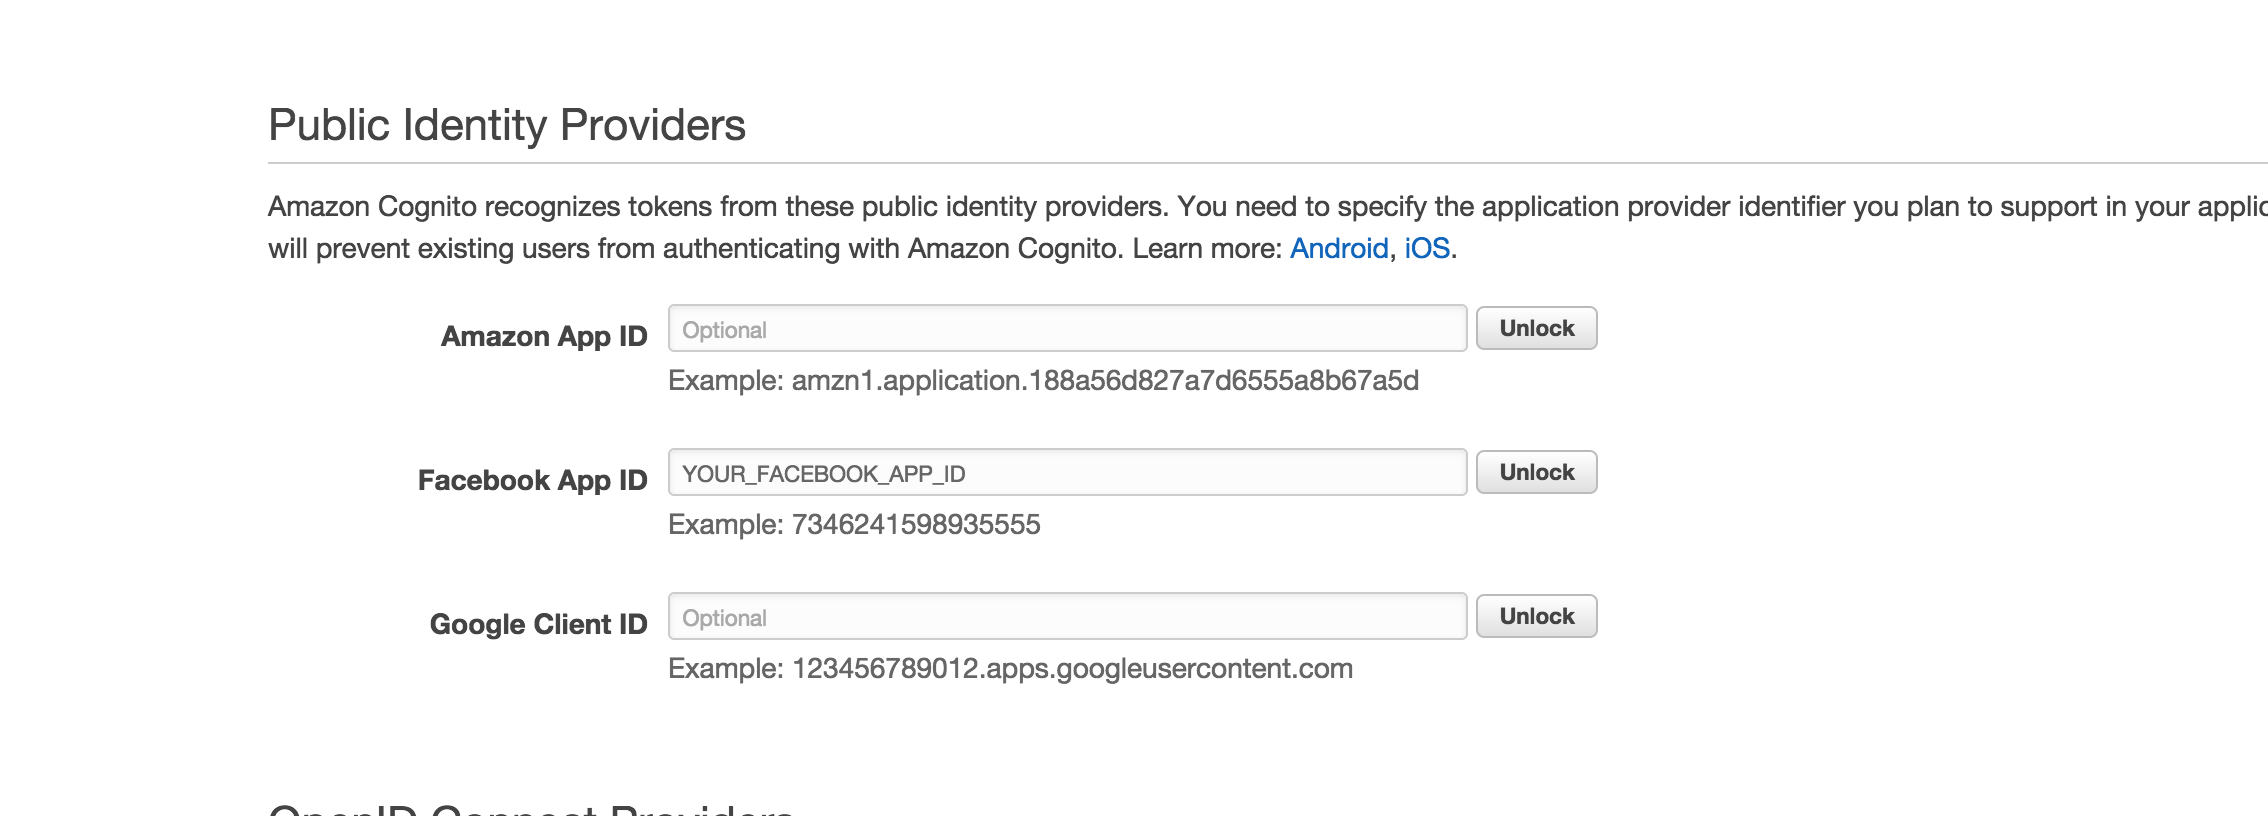
That’s all you need to do to enable Facebook authentication in Cognito.
Facebook SDK Configuration
There is a bit more configuration to be done within the app itself. You need to add certain information to Info.plist file. Follow Step 4 in the official Facebook documentation here: https://developers.facebook.com/docs/ios/getting-started
Since we will be using the FBLoginView we need to handle responses passed back to the app. To do this the following method needs to be overriden in the app delegate:
func application(application: UIApplication!, openURL url: NSURL!, sourceApplication: String!, annotation: AnyObject!) -> Bool {
  return FBAppCall.handleOpenURL(url, sourceApplication: sourceApplication)
}
Create FBLoginViewController
Let’s create a view controller responsible for displaying the Facebook login button:
    class FBLoginViewController: UIViewController, FBLoginViewDelegate {
     let displayDetialSegueId = "displayDetails"

     @IBOutlet weak var showDetailsButton: UIButton!

     override func viewDidLoad() {
       super.viewDidLoad()

       let fbLogin: FBLoginView = FBLoginView()
       fbLogin.delegate = self
       fbLogin.center = view.center

       view.addSubview(fbLogin)
     }

     override func didReceiveMemoryWarning() {
       super.didReceiveMemoryWarning()
     }

     func loginViewShowingLoggedInUser(loginView: FBLoginView!) {
       showDetailsButton.enabled = true
       presentDetailsController()
     }

     func loginViewShowingLoggedOutUser(loginView: FBLoginView!) {
       showDetailsButton.enabled = false
     }

     @IBAction func showDetailButtonClicked(sender: AnyObject) {
       presentDetailsController();
     }

     private func presentDetailsController() {
       performSegueWithIdentifier(displayDetialSegueId, sender: self)
     }
}
Few things worth noting here:
-
This view controller implements FBLoginViewDelegate It allows us to get calls from the Facebook SDK when user is logged in and logged out
-
FBLoginView It is responsible for displaying the Login/Logout button. Notice that the delegate is set to self.
-
loginViewShowingLoggedInUser It is called when user is logged in. In this app it simply forces the details controller view to be displayed. I will create it shortly. There is a button that allows user to display user details once clicked. It is needed since I use navigation controller and user is allowed to come back to this screen to log out for example. This button is also enabled here since we know that the user was authenticated and we can access these details.
-
loginViewShowingLoggedOutUser As the name suggests it is called when user is logged out of Facebook. Since we won’t have access to Cognito at this point we disable the button allowing user to display user details view.
Connecting to Cognito
In order to connect to Cognito I will reuse the CognitoStore class that you saw in the previous post. There is not really many changes that need to happen to use Facebook authentication (or any other):
     init(provider: AWSCognitoLoginProviderKey, token: String) {
       let logins = [provider.rawValue : token]

       AWSLogger.defaultLogger().logLevel = AWSLogLevel.Verbose

       credentialsProvider = AWSCognitoCredentialsProvider.credentialsWithRegionType(
          AmazonCognitoCredentials.region,
          accountId: AmazonCognitoCredentials.accountId,
          identityPoolId: AmazonCognitoCredentials.poolId,
          unauthRoleArn: AmazonCognitoCredentials.unauthArn,
          authRoleArn: AmazonCognitoCredentials.authArn,
          logins: logins)

       let configuration: AWSServiceConfiguration = AWSServiceConfiguration(
        region: AmazonCognitoCredentials.region,
        credentialsProvider: credentialsProvider)

       client = AWSCognito(configuration: configuration)

       AWSServiceManager.defaultServiceManager()
        .setDefaultServiceConfiguration(configuration);
     }

    class func connectWithFacebook() -> CognitoStore {
       return CognitoStore(provider: AWSCognitoLoginProviderKey.Facebook,
        token: FBSession.activeSession().accessTokenData.accessToken)
    }
The changes:
-
init() The init method now accepts provider and token as arguments. The provider is an enum type AWSCognitoLoginProviderKey the token on the other hand is value returned by the third party (in our case Facebook) after user was logged in.
-
Use the provider and token We need to pass the token and provider value as a dictionary when creating credentials provider. Note that we need raw value of the AWSCognitoLoginProviderKey enum
-
connectWithFacebook() This is convenience factory method that creates CognitoStore with Facebook as a provider. It also extracts the accessToken for the current session so that Cognito can authenticate the user.
Create DetailsViewController
The last thing to do is to create controller that will use the CognitoStore. As mentioned earlier it will be displayed when user login is successful.
    class DetailsViewController: UIViewController {
     private let nickKey: String = "nick"
     private let emailKey: String = "email"

     var cognitoStore: CognitoStore = CognitoStore.connectWithFacebook()

     @IBOutlet weak var nicknameTextField: UITextField!
     @IBOutlet weak var emailTextField: UITextField!

     override func viewDidLoad() {
       super.viewDidLoad()
       NSNotificationCenter.defaultCenter().addObserver(self, selector: "receivedIdentity:", name: CognitoStoreReceivedIdentityIdNotification, object: cognitoStore)

       cognitoStore.requestIdentity()
     }

     override func didReceiveMemoryWarning() {
       super.didReceiveMemoryWarning()
     }

     @IBAction func saveUserDetails(sender: AnyObject) {
       if nicknameTextField.hasText() {
         cognitoStore.saveItem(nickKey, value: nicknameTextField.text)
       }

       if emailTextField.hasText() {
         cognitoStore.saveItem(emailKey, value: emailTextField.text)
       }
     }

     func receivedIdentity(notification: NSNotification) {
       requestUserInfo()
     }

     private func requestUserInfo() {
       cognitoStore.loadInfo(updateDisplayWithUserInfo)
     }

     private func updateDisplayWithUserInfo(userInfo: Dictionary<NSObject, AnyObject>) {
       dispatch_sync(dispatch_get_main_queue(), { () -> Void in

         if var nick: String = userInfo[self.nickKey] as? String {
           self.nicknameTextField.text = nick
         }

         if var email: String = userInfo[self.emailKey] as? String {
           self.emailTextField.text = email
         }
       })
     }
    }
Again most of that code should be familiar to you from previous parts. The main difference is that the cognito store is created using the factory method.
GitHub Repo
All code for the project is hosted in this repo. This project uses CocoaPods so you will need these installed. Before you can run the application make sure to update Info.plist and AmazonCognitoCredentials with appropriate values.